Beginner-Friendly Guide to Setting Up cPanel Hosting
Starting your first website may feel confusing, but with the right tools, it becomes very simple. One of the easiest ways to manage a website is by using cPanel hosting. This guide will help beginners understand what cPanel is and how to set it up step by step.
What Is cPanel Hosting?
cPanel is a popular control panel that helps you manage your website easily using a simple dashboard. You can upload files, create emails, manage databases, and control your website without technical skills. With cPanel hosting, your hosting provider gives you access to this dashboard so you can control everything in one place.
Why Choose cPanel Hosting?
cPanel is widely used because it is simple, powerful, and beginner-friendly.
Key Benefits:
- Easy-to-use interface
- Manage files, emails, and databases in one place
- One-click app installation (like WordPress)
- No coding knowledge required
- Saves time with automation tools
Many hosting providers use cPanel because it gives full control while still being easy for beginners.
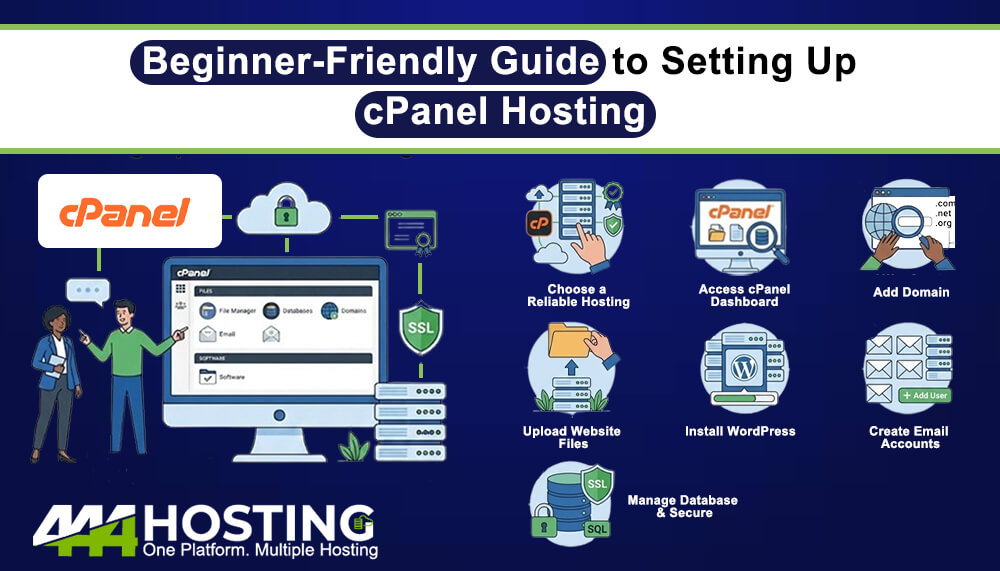
Getting Started with cPanel Hosting
Step 1: Choose a Reliable Hosting Provider
To start, you need a hosting plan that includes cPanel. A good option is 444 Hosting, which offers beginner-friendly cPanel hosting with strong performance and support.
Start Your cPanel Hosting Here
Their cPanel hosting includes:
- Easy website management
- Free daily backups
- One-click installer
- 24/7 support
- Fast and reliable servers
Step 2: Access Your cPanel Dashboard
After buying your hosting plan:
- Log in to your hosting account
- Open the cPanel dashboard
This is your main control area where you manage everything.
Step 3: Add Your Domain
- Go to “Domains” in cPanel
- Add your domain name
- Connect it to your hosting
This step makes your website live on the internet.
Step 4: Upload Your Website Files
You can upload files using:
- File Manager (inside cPanel)
- FTP (advanced option)
Most users upload files to the public_html folder.
Step 5: Install WordPress (Optional but Recommended)
With Softaculous (one-click installer):
- Go to “Softaculous Apps Installer”
- Select WordPress
- Click Install
This lets you build your website quickly without coding.
Step 6: Create Email Accounts
- Go to “Email Accounts”
- Create a professional email like: [email protected]
This helps your business look more professional.
Step 7: Manage Databases
If your website needs a database:
- Use “MySQL Databases”
- Create and manage databases easily
cPanel makes this simple even for beginners.
Step 8: Secure Your Website
Security is very important. With cPanel hosting, you can:
- Install SSL certificates
- Enable backups
- Use security tools
This protects your website and your users.
Why Choose 444 Hosting for cPanel Hosting?
444 Hosting is a strong choice for beginners and businesses.
- Key Advantages:
- Beginner-friendly control panel
- 99.5% uptime guarantee
- Free migration support
- 7-day money-back guarantee
- 24/7 expert support
Whether you are starting a blog, business website, or portfolio, their cPanel hosting makes everything easy.
Final Thoughts
Setting up cPanel hosting is simple when you follow the right steps. It gives you full control over your website without needing technical skills. If you are just starting, choosing a reliable provider like 444 Hosting can make the process even easier. With the right hosting and tools, you can launch your website quickly and grow your online presence with confidence.